
Creative iMedia
Markgrids using mailmerge
This page is really only of interest to teachers. I mean, read it by all means, but it's not useful for getting marks and is probably awfully geeky
This page deals with a way of automating the creation of individual markgrids for iMedia, with candidate names and numbers added and the grids saved as separate files using the OCR naming protocol. In seconds.
This work was set in motion by a blog post on the OCR website by a subject advisor, Debbie Williams. It suggested using mailmerge to help take some of the tedium out of filling out URS (markgrids).
Good idea. Especially as I had 70 to complete and even filling out the names and candidate numbers was doing my head in.
The trouble is that the April 2024 Word version of the URS sheets that OCR published (here) didn't even allow highlighting, let alone any attempt at mailmerge. And the PDF versions didn't have expanding text boxes, so if you needed to write a lot of notes to justify marks, which I do, it was impossible. All of which annoyed me greatly.
There are ways to solve these problems. But it's a bit tricky... And then a simple mailmerge will just create one huge, long file with 70 versions of the same markgrid – which then need splitting and saving as individual documents, all named in the way OCR wants. All of which is a massive time sink.
So, there's a solution, part of which comes from this YouTube video from Nico Paphitis, a teacher from Cyprus, which helped solve many of the issues. Then I was only left with the formatting of the OCR sheets, which was "interesting" in places...
The solution
This uses a macro. There are some technical notes below that might come into play because some stuff might not work.
This is written from a Windows user point of view. It does work on a Mac but it's a little different at odd stages. If you need to use a Mac to do this and can't figure it out, let me know and I'll give you a hand
If you don't want to use a macro, but do want to know how to make the markgrids more easily editable, see the cracking an OCR markgrid section right at the bottom of the page.
Step 1 – Make a folder:
Somewhere in your documents, create a folder called something like "word". If you're going to want PDF files as well, create another one called something like "pdf".
These are the locations that you'll need to copy the filepath into in step 2.
Step 2 – The Data file:
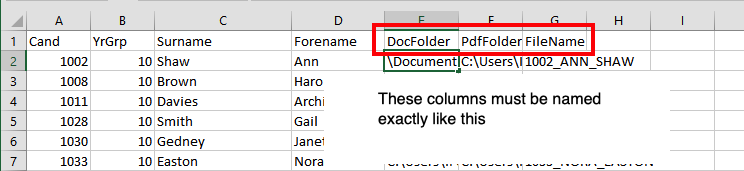
You need to start with a data file. I've provided one to use as a template. There are different ways to organise this, but the key columns are E, F and G. The column headers for these must be named exactly as they are. E and F specify the folder location where you want to create the markgrids (see below), and G is the name the output file will be given – which should match the OCR specified file name.
Note that the names are ones I copied from a WJEC customers spreadsheet and not the real names of any children I've ever taught.
Column G is the filename that you want to give each markgrid. This is calculated using concatenation from the candidate number, surname and first name. I have a year group column in my spreadsheet as well, but that's not required. You can add other columns and the three key columns don't need to be in those locations, they just need to have those column header names.
To find the folder location, open File Explorer, navigate so that you can see that folder (but aren't in it). Right click on it and choose Copy Link. Paste this in cell E2 and then copy this down the column.

If you want PDFs as well, do the same for that folder in cell F2.
Step 3 – The Word documents:
I've created a series of word documents to use. You can choose to do your own mailmerge and add the macro in by hand – helpful if you can't download macro enabled files (see technical issues below) – or you can have all of this done for you, in which case you simply need to add the names and numbers for your candidates in the spreadsheet.
Note that you want to type the session (January or June), year, scenario title, centre name, and centre number in the table before you start any mailmerging. These are the same for each candidate of course – it's the candidate name and number that take the time to type by hand each time.
![]() R094 markgrid – no macros or mailmerge
R094 markgrid – no macros or mailmerge
![]() R094 markgrid merged – with a basic merge in place. You'll be prompted to locate the data file when you open it. You can change the data file later
R094 markgrid merged – with a basic merge in place. You'll be prompted to locate the data file when you open it. You can change the data file later
![]() R094 markgrid with macros – this has the macro already in place as well as a basic mailmerge
R094 markgrid with macros – this has the macro already in place as well as a basic mailmerge
The R09X markgrids are below. You need to replace the Xs in each file with the unit number before you merge them. There are three places – top of the first page, the footer, and in the first line of the table. You'll also need to enter the name of the unit in the table.
![]() R09X markgrid – no macros or mailmerge
R09X markgrid – no macros or mailmerge
![]() R09X markgrid merged – no macros, but has the mailmerge started
R09X markgrid merged – no macros, but has the mailmerge started
![]() R09X markgrid with macros – with macros and basic mailmerge fields
R09X markgrid with macros – with macros and basic mailmerge fields
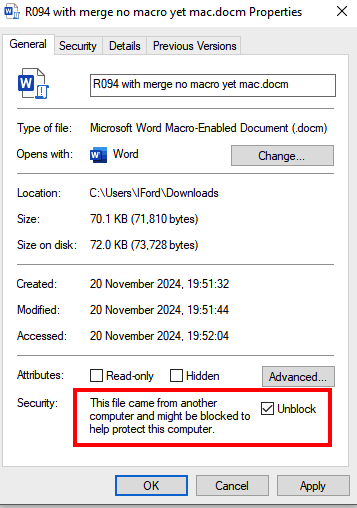
If you want to use the macro enabled versions, you may need to unblock the file, particularly on a school system. In Windows Explorer, right click on the file > Properties and tick unblock at the bottom (see this screenshot)
Note that I've done quite a bit of work on these, including setting up the tables slightly differently, mainly so that you don't end up with random page breaks. If you prefer to use an original OCR document you can do, but see the cracking an OCR markgrid section below for something you may need to do.
Note as well that these documents remain copyright OCR. No claim on copyright is made here, and I'm only including them to make the life of teachers having to complete them easier. Because that's what OCR suggested in that initial blog entry but have made a lot harder through their protection of the files.
Step 4 – The Macros:
If you've not been able to download a macro enabled word document (see the technical issues below), you'll need to add the macros by hand. Or you might want to do this anyway. That's cool and geeky.
The text files have the macro code in them. You should be able to view and download these without a problem.
Don't worry that these files look a mess when you open the page. Either save the file or copy and paste the text into a text editor or straight into the VB editor and things will be fine. Probably...
![]() Macro for creating only word markgrids
Macro for creating only word markgrids
![]() Macro for creating word and pdf markgrids
Macro for creating word and pdf markgrids
You'll need to copy the code into your base document and then save the file as a macro enabled document (.docm format). To do this:
- First show the Developer Tab: File > Options (at bottom) > Customize ribbon > tick the Developer tab on the right hand side
- Go to the Developer tab and on the left, click the Macro button
- Use the Macros in drop down to choose the document you're editing (something like r094basic.docx). This caused me problems at the next stage with my school account, and the only option I had was to use the All active documents and templates option to do this. That works, and actually means the macro is available in every Word document I used. But you might not like the idea of this. Basically you need the Create button to be active
- In the top box, give the macro a random name. I used test each time. This will get removed at the next step
- Hit the Create button. Which launches the Visual Basic editor
- Open the macro file in a text editor or in the browser
- Copy the macro code and paste it into the VB editor, replacing the test macro section that just got created
- Hit the save button at the top left
- Close down the entire VB editor window
At this point, it's probably best to save your Word document as a Macro enabled file: go File > Save As > Change the file type dropdown to Word macro-enabled document (.docm)
Hopefully you've already set up the folder you'll need from step 1 and added the file path in column E from step 2. If you have, it's time to run the macro...
Step 5 – Run the Macro
To run the macro, go to the Developer tab, hit the Macros button, click on the name of the macro if it's not already clicked on, and then press the Run button.
Be patient here! If you use File Explorer to go to the folder you created in step 1 you can see the Word documents being created one by one. It takes a couple of minutes if you have lots to create.
I seem to find that after the macro has finished that my Word document is unresponsive for a while. Clicking off it into another window and then coming back to it seems to help
Now you just need to fill in the markgrids...
Extending the mailmerge
You might want to to add to the mailmerge. You could mailmerge the individual marks for each section really easily. And add the total mark. Those would be just columns you add in for each mark section (I used 1a, 1b, 1c etc...) and then a calculated column for the total. It works well as it happens.
You could even merge in the comments to be added to each box of the grid. I prefer not to, as I hate typing in Excel, but it's something that Debbie Williams suggests in that original blog entry.
Technical issues
So, on the question of security, I didn't write this macro. I've adapted it. I've looked at the code and I'm fairly certain it's safe to run. I've certainly run it, several times, on both school and my own computers. I accept that you'll have to trust me on this, and I can't guarantee anything to you, but I'll certainly continue to use it.
So, the first thing to say is that this uses macros. You need to have the necessary permissions to add a macro to a document, save as a macro enabled word document and then run the macro. You might find that if you're using a school system that none of this is possible. You could try talking to your IT techs, but increasingly I've found that they'll blame academy chain decisions for this sort of thing.
You might run into problems even trying to download the macro enabled documents. And be aware that e-mailing macro enabled documents might be difficult – I certainly couldn't e-mail one to my school account.
Once you have downloaded a macro enabled file, I needed to unblock it before I could use it with my school account. In File explorer, I needed to right click on the file > Properties > at the bottom tick the unblock button (see this screenshot). And you'll have to accept various things to allow macros to run.
Of course, your IT techs might do this for you (it's simple and they might enjoy it (<waves at IT techs> – this is pretty cool guys)). Or you could get the higher up IT techs to do it if they insist on blocking your ability to save yourself hours of work. Or you could use a home system, but neither mailmerge or macros are possible using the online version of Office, so you'll need a desktop version.
This does work on Macs, with a few minor differences. I've used it on my Mac and it does the same job. Getting macros to run is a slightly different process, but it's fairly straightforward. And Google Docs can't do mailmerge natively, so there's probably no easy alternative to Microsoft here.
If you run into any issues feel free to drop me a line and tell me. We'll see if we can find a solution.
Cracking an OCR markgrid
I've done quite a bit of editing to clean up the formatting in OCR's markgrids. If you want to use one that I've not done that with. That's cool.
But, OCR's April 2024 version of the markgrids were protected against much in the way of editing (they'd essentially made them forms). This makes them difficult to use and mailmerge is impossible.
To make them easier to use, do this:
- Open the file
- Show the Developer tab – File > Options > Customize ribbon > Tick the Developer box on the right
- Then, on the Developer tab at the top, click Restrict Editing
- At the bottom, untick the Editing restrictions box
This opens up the possibility of mailmerging. You might want to remove the grey highlighting in boxes. And be aware that there will be random formatting in places.
Hopefully in future releases of the markgrids OCR will remove this technical restriction. And maybe cleaned up the table formatting as well...